Thursday, 7 November 2019

Helping with Systematic Reviews


Just after I started last Autumn, I was really excited to have the opportunity to get involved with helping design and run the searches for a few systematic reviews.

In the last few weeks, two of those systematic reviews have been published! They are:


It’s great to see that not only are they now published, but I’m very grateful that both authors chose to include me as an author too. It’s incredible to look back at how many SRs we’ve helped with this last year at UHL – I’m currently helping on my 17th!

Whilst the projects themselves were really interesting, it was also a great learning opportunity for me as a new Clinical Librarian too. In 2019, I’ve also had the opportunity to go on two courses on systematic review searching. The main things I’ve learnt are:
  1. Whilst daunting for a perfectionist at first, once you’ve done a few, they’re the best thing! It’s really satisfying creating a sensitive strategy that fits the question well.
  2. Don’t be afraid to experiment with different databases, and with different fields.
  3. Keep open communication with requestors, and manage expectations. I learnt from my colleagues about the benefits of scoping strategies, and now I use them every time. They really help gauge whether I’ve understood the question correctly, and pin down what the requestor wants, as well as giving them a good idea on result numbers.
  4. Run tests to check the key articles have been found. This was emphasised on the courses, but I have also found it reassures requestors, and helps you identify any terms that might have been missed.
My final learning point is that librarians deserve credit for their input! Developing high-quality strategies is a real skill and can take weeks. I’m now much less daunted by the prospect of asking for acknowledgement or authorship for my contributions upfront.


Wednesday, 5 June 2019

A handy resource for updating systematic review searches


As someone who has only worked on systematic reviews for the past year or so, I am also fairly new to the concept of re-running searches.

Previously I thought it was as simple as re-running a strategy, limiting it to the years covering the interim period, and sending off the RIS files for any deduplication with existing results. However, when on the Systematic Reviews course provided by the CRD team at the University of York, this topic was brought up, and we were told it’s a much more complicated process than you’d think. In fact it takes up a whole separate course by itself!

So when I was asked by one of the Fellows to run an update search for their systematic review, I knew I needed to look into how to do this properly. The problem is, limiting by date only limits by publication date, not when the record was added to the database. Therefore, if only limiting by date, you won’t pick up records from outside of that publication period, which also weren’t on the database at the time of the initial searches. However, searching by the date added to the database was not as straightforward as it seemed.

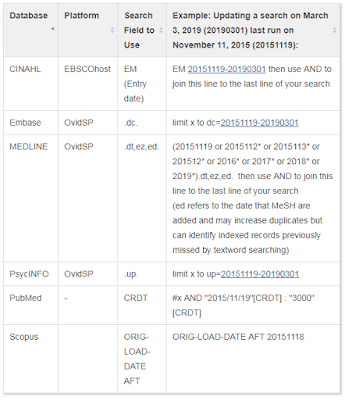
I quickly found talk of using the “date delivered” field on Ovid, but no specific help on the correct syntax to use. That’s when I found this wonderful page from the McGill library:


They’ve created a really useful table with templates of the correct syntax for each database:


As I tend to use the native interfaces for systematic reviews, this is an absolute lifesaver. I’m yet to discover how this is possible if using HDAS (if at all), but for the moment this great resource is firmly bookmarked.

Do you have any tips or tricks for re-running searches? Let us know!

Tuesday, 8 January 2019

Multiple highlighting using Chrome extensions

Anyone who does literature searching will know it can be a tedious job scanning through potentially hundreds of abstracts to pick out relevant results. When recently going through HDAS results, I thought it would be useful to be able to highlight multiple words at once (more than the one allowed by CTRL + F!) – it would make the whole process much quicker and effective! A short Google later and I found two Chrome extensions that do just that. Both are available for free from the Google Chrome Web Store (links through the titles). So, here are my thoughts on the two, and how I have found them useful:

Overview


The first extension I found, this is very simple to use. To do so, you simply click the icon in the top right of the toolbar, and type the words you wish to find into the box, separated by a space:


Once activated using the on/off switch, it will highlight those words on every page you visit unless you turn it off. However, just be careful because it starts recycling colours after 6 words!


Tips

  1. You can use the colour recycling to your advantage, by distributing any synonyms to every 6 words.
  2. The third word highlights in red, so I find it useful to put a word indicating irrelevance here.


Pros

  • Really quick and intuitive to use!
  • Saves the words until you manually delete them.
  • Not case-sensitive.

Cons

  • Doesn’t support phrase searching, truncation or wildcards.
  • Recycles colours.
  • Doesn’t search within words, so you need to specify each variation e.g. ascit wouldn’t bring back ascites or ascitic – you need to put both.
  • Doesn’t work with pdfs.

Highlight This

(Or, to give it’s full name - Highlight This: finds and marks words in text)

Overview


I actually found this after increasing frustrations with Multi-highlight led me to look elsewhere. It’s not immediately obvious from its page on the Web Store, but this little extension has a lot of functionality and does address many of Multi-highlight’s flaws.

A little more complex to use, you assign words to lists which have a specified colour. However, this means that you can choose the colours you want to assign. To do so, you can either choose from their selection, or be more specific using a HTML colour code.  I use this site https://www.rapidtables.com/web/color/html-color-codes.html to find and copy over the codes. Truncation and wildcards are also supported, as is phrase searching as new words are indicated by a line break, not a space.


Tips


  1. You can highlight synonyms in the same colour, by assigning them to the same list. I’ve found it useful to have an “off-topic” list which highlights in red so I can see irrelevant results more easily.
  2. You can add words to a list simply by highlighting with your mouse and right clicking:

Pros


  • More choice of highlighting colours.
  • Synonyms can be easily highlighted in the same colour.
  • Truncation and wildcards are supported (although it also automatically searches within words – this can be turned off though!).
  • Phrases can be highlighted.
  • Individual lists can be paused, or the whole extension turned off.
  • You don’t have to go into the app to add new words to lists.
  • You can specify which sites it can highlight on.
  • Saves the words until you manually delete them.
  • Not case-sensitive.

Cons


  • Bit trickier, less intuitive and more time consuming to set up (the help page is really useful though).
  • Doesn’t work with pdfs.


All-in-all, I think it’s clear my favourite is Highlight This! However, if you’re after a quick and simple way to highlight only a couple of words, Multi-highlight may still be best for you. They have certainly both helped my results-scanning efficiency.

Have you tried either of these extensions, or maybe some similar ones? Let us know your favourites and any tips and tricks!